
If you fall in the category of the majority of people, you most likely have a lot of items that need to be stored but have insufficient room to do so. This issue can be effectively solved for most homeowners by building a garage, which doesn’t have to be expensive.
The following article will demonstrate how to construct a low-cost garage that is ideal for your requirements. So continue reading if you’re ready to start constructing!
What’s The Importance of Building a Garage?
A garage can offer more room to your home, whether it is attached or detached, and be used for a variety of purposes. For example, it can be used as a work studio with walls of shelving for extra domestic storage or as a place to park the family’s cars and bikes.
- Security: When not in use, keeping your car in a garage helps better shield it from the elements, inclement weather, vandalism, and theft.
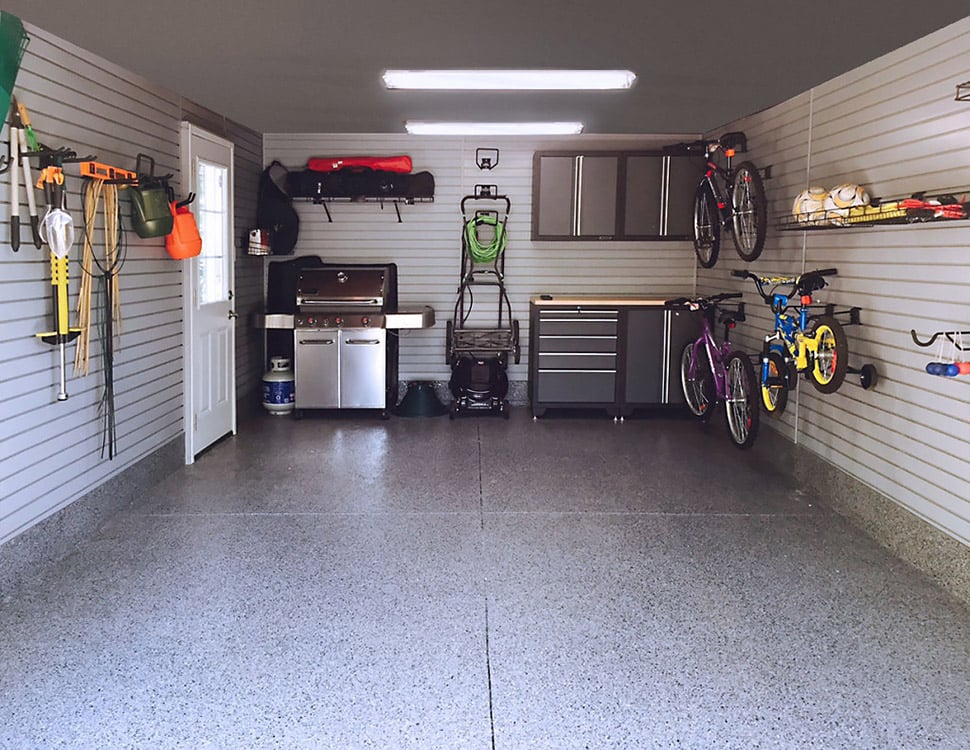
- Storage: Do you need additional room for your seasonal décor, such as your Christmas tree? Your home might get additional hidden storage space with a garage.
- Worth: A new garage provides a 65% return on investment and can raise the value of your house.
- Additional space: With the right permissions, a garage can be transformed into an additional bedroom, a work studio, or a home gym.
Build A Garage While Saving Money
Where are you going to store your extra garden equipment, bicycles, sailboats, and oddities? Most homes cannot hold such large items, and the small amount of storage space in a garage build a shed may already be full. Parking cars and securing extra belongings in the garage is a terrific idea. How can a larger garage can be built with the smallest amount of money spent?
There are two main approaches to building a durable garage. Let’s look at how pole garages differ from traditional construction methods more materials first.
What Is the Price of Building a Garage?
The average cost of constructing a garage is about $27,600, but you can build a small, straightforward garage for as little as $5,000 or a bigger garage that serves as both an apartment and a space large enough to park an RV for as much as $60,000 or more. A secure, solid structure must be built with labor, which accounts for the majority of the cost yet only makes up around 30% of the total cost. Most tasks will come in the range of $16,500 to $40,000.
Here is a brief breakdown of how much it will cost to create a garage dependent on how big deal many cars it can accommodate:
Number of Cars
- 1 – $20,000
- 2 – $30,000
- 3 – $40,500
Pole Buildings/Garage
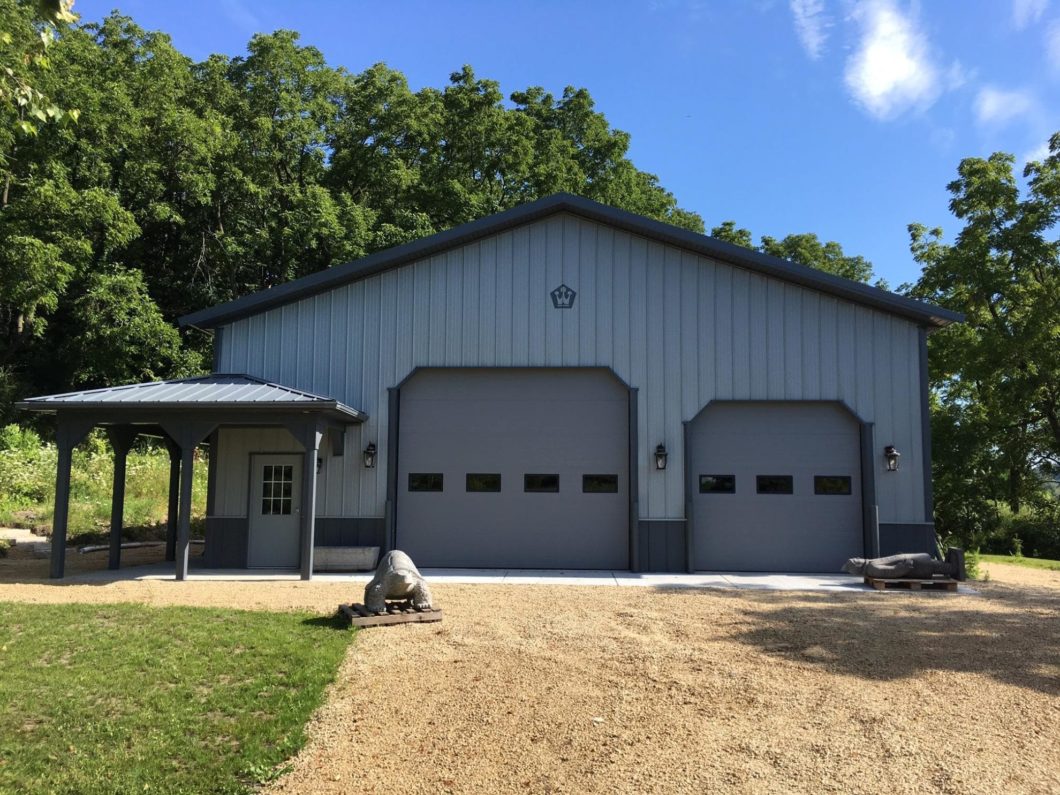
How can we build a garage without going over budget? One of the quickest and least expensive ways to get a garage up and running is to erect a pole-style post frame construction. Many refer to these pole style building, as post-frame buildings or pole barns because they believe they are superior than traditional stick-built garages. There is no doubt that if you want to discover how to build a cheap garage, you should go deeper into this topic.
Laminated wood poles serve as the framework for pole buildings, which are storage buildings. They serve as the garage’s framework and sustain its weight in the event of severe snowfall or blustery winds. Even though metal panels hold most roofs in place, you can come across those that have shingles that better complement the design of the remaining components of the house.
Building a pole garage has a lot of benefits. First is its inexpensive or free foundation. The majority of homeowners will have to pay the first 10%–15% of the whole garage foundation’s overall cost. A pole garage building process does not require a concrete foundation, but for stability, the poles must be buried in the ground. However, you can opt to set one up.
Because post-frame construction is faster than traditional techniques like stick-building, it is very popular. In addition, building time can be shortened without compromising quality because there are fewer variables.
Storage is also much more streamlined in a post-frame construction because there are no internal walls that must support weight. Rather, you’ll have more than enough space to park multiple cars, store seasonal décor and seasonal decorations, and store your lawnmower and other yard equipment until the following year. A floor plan like this has so many benefits that they are nearly endless.
You might be surprised by the cost per square foot for this style of garage building. Spend between $10 and $30 per square foot to assemble a straightforward pole building. In addition, if you opt not to build the garage yourself, you might have to pay additional costs for labor.
Easy-to-Build Garage Kit for Storage Space
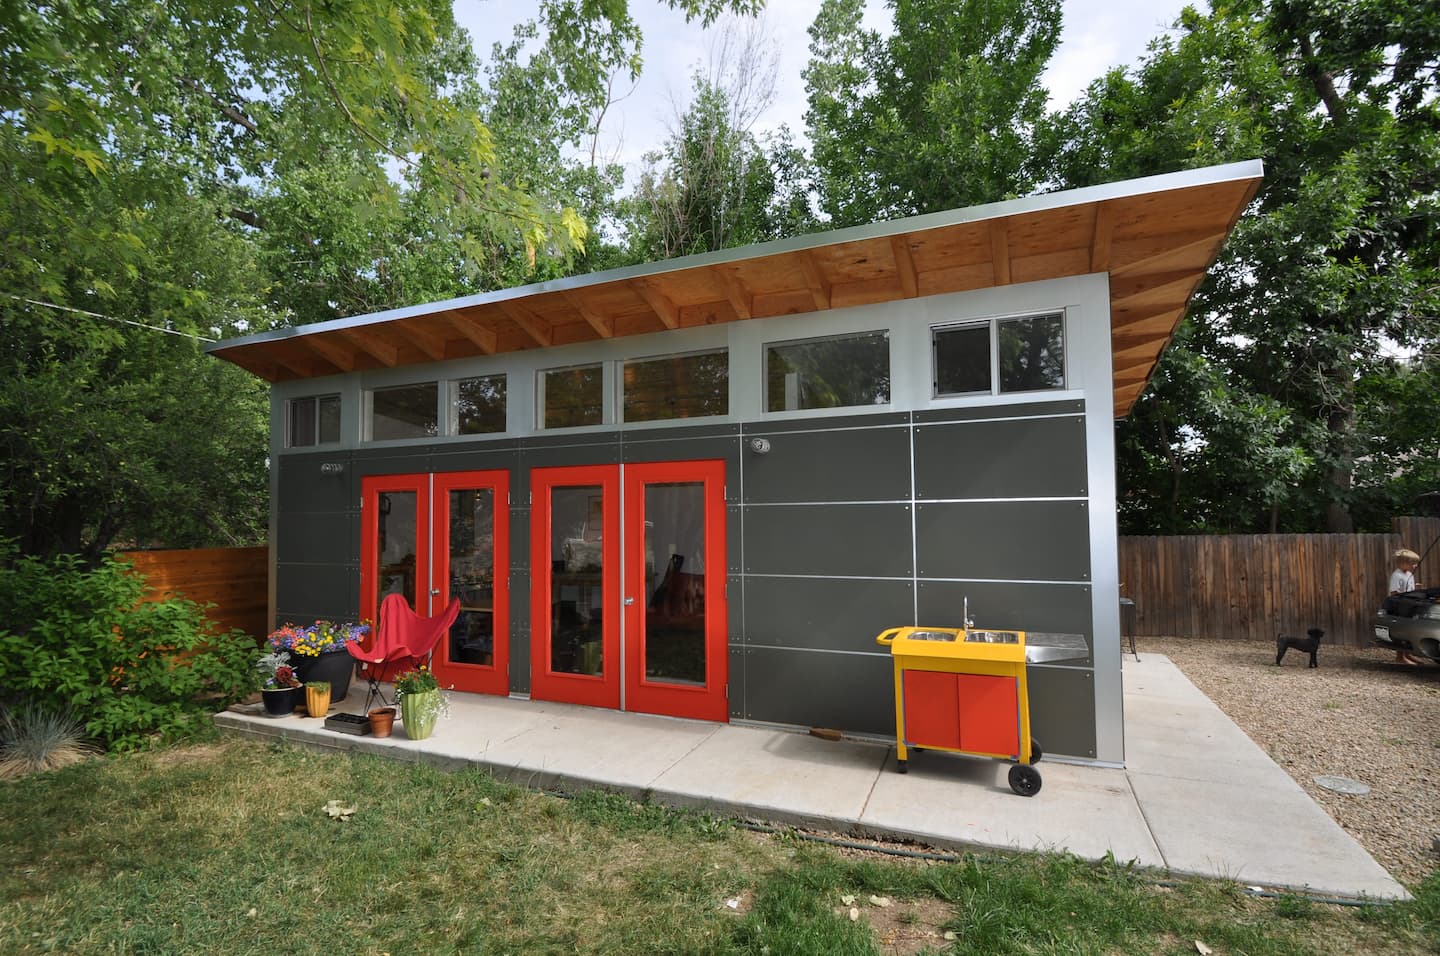
Not everyone likes the retro style of pole buildings. Although a stick-built garage will cost more than a pole structure, kits that include the concrete floors and all the necessary materials can be purchased for a fair price. However, it’s feasible that there are superior alternatives to a kit.
Many people have preconceived ideas about the design and functionality of their garages. For instance, they might like to construct guest rooms or an office above the garage. Unfortunately, it can be difficult to satisfy such special needs with the basic product you get whether you build a pole garage or buy a stick-built kit.
The biggest benefit of a wrap garage is that it can be modified. Every building can be totally unique and still work with the overall scheme. You can also make use of the choices that come with a prefabricated building or pole carport. Ultimately, your contractor will be able to resolve any problems you may have and win your satisfaction.
Sadly, pole garage construction is significantly less expensive than traditional garage construction. Building a a two car garage costs $49.00 per square foot on average. In comparison with pay half the price of a pole building, a single-car garage can be constructed for an average of $7,500 to $14,200, which is a substantial outlay.
Building The Perfect Carport
Finally, it would be beneficial to think about how much you are prepared to invest in realizing your goals or the garage. Others will prefer the flexibility that a stick-built garage can offer, while certain individuals will be entirely content with the amount of space provided by a pole garage. Whatever you choose, make sure you look into the least-priced garage construction possibilities.
Types of garages and carports
If you’re thinking about building a garage, you’ll need to decide if you want it to be open to the weather or enclosed and perfect for security. A more permanent construction will cost more, but it will also be more convenient for those who desire it.
For those who require a parking space as quickly as is practical and at the lowest possible cost, prefabricated carport and garage kits are preferred.
Independent Metal Garages Constructed in a Factory Using Prefabricated Parts
This garage can be delivered to your house fully built or in parts that just need a little bit of assembly.
Prefab garages are commonly used in home upgrades because of their inexpensive and cost effective, and the potential that the homeowner may assemble them. They are often built of steel. Larger lots in rural areas have made this garage popular due to its versatility.
Free-standing, non-prefabricated garage
Building a garage from the ground up allows you a great deal of creative freedom, but it is more expensive than remodeling an existing structure. You might find that building a new garage gives you the most freedom in terms of aesthetics and functionality if your home is made of brick, concrete, wood, etc.
Before hiring a garage door manufacturer, speak with a local architect and builder who can assist you in realizing your vision for the next living space above.
Building A Garage Inside A House’s Main Structure
Even though it is technically feasible, attaching the roof pitch a garage to the side of a house is usually reserved for the most costly solutions and requires careful planning if the building’s exterior walls that support weight will be altered.
But if you use this tactic, you can save money and can raise the worth of your house and make it simpler to get to your automobile.
Carport
A carport is the most affordable way to cover a car and may be made to fit any style. For instance, you might construct one from a steel kit or go with a more traditional, federation-style timber building. In the summertime, wooden carports could be a better option than steel garages since they create a cooler atmosphere by partially shading the sun without being totally enclosed.
You can expand your carport to offer more covered space more storage, if your needs (or your budget) ever increase. Some carports even have a roof-mounted door that may be used to turn them into garages if necessary.
Steps to Build a Garage
Building a garage requires starting the project from scratch, much like building a house. You can begin pouring the foundation, framing the building, installing electrical and/or plumbing work, and adding the finishing touches to permanent structure, such as paint, siding, and trim, once the permits and planning are complete.
Make a Plan
A garage should take into account a number of factors. Establish a strategy before you begin. This include figuring out how big the garage should be, following city codes, choosing the type of roof, how many doors and windows to put in, and which components to outsource. Your plan’s specifications will be determined by local laws, so be sure to check the website of your city to find out about the procedures for obtaining permits and construction plans as well as any particular local restrictions. To let them know about your project, talk to your neighbors and, if applicable, the homeowners association. As long as you don’t need a variance from city regulations, you can generally move on with the construction of your garage.
In one instance, where alleyways and small lots are typical, a person chose to construct a detached two-car garage in the backyard off the alley. Important municipal regulations required that the new building remain a certain distance from neighboring structures, the alley right of way, and property lines. You must draw up a site plan sketch that includes your lot and any nearby lots, correct measurements, and the metal stakes used to mark the corners of your lot. You might want a professional survey if you can’t locate the marks on your land. The city also demands top-view site plans and comprehensive building drawings. There isn’t much artistic skill needed.
When designing your designs, think about using online resources such as satellite imagery and information on property lines. Although it’s not required, programs such as Google SketchUp can assist in visualizing how the garage will seem in relation to its surroundings. Visit the Minnesota Development Review office to discuss your idea after completing your designs. Before granting a building permit, they will walk you through the procedure, identify any problems, and give you a chance to fix them. Permit costs vary according to the location and scale of the project. Once you get the permission, you may start hiring subcontractors and buying supplies.
To make it easier, here are some of the notable things you should ask yourself while making your plans:
- How big should the garage be, in your opinion?
- How big can the garage be (given city regulations)?
- How many windows and doors are there?
- Which kind of roof?
- Which portions will you outsource?
Subcontractors
You take on the role of the main contractor and responsibility for the construction once you receive a building permit. You might be held accountable if a building collapses and damages your next neighbor’s property or car. This is manageable if you are doing every aspect of the construction job yourself. You will almost certainly outsource part of the work, though. For instance, some people hired a subcontractor to lay the foundation because they lacked the ambition and ability to dig a 440-square-foot hole.
It’s recommended to schedule meetings and obtain estimates from at least three professionals for each assignment when subcontracting. Ask your neighbors for referrals, check the Better Business Bureau for any complaints made against possible subcontractors, and take the companies’ length and reputation into account. Don’t skimp on subcontractors because their inexperience or limited lifespan increases the likelihood of poor-quality work. Friends’ recommendations should be used with caution as these unofficial relationships can result in additional expenses and delays. If your intentions, expectations, and payment terms are made clear, the majority of experts will work to keep their reputations.
A written contract is necessary once you’ve selected a contractor, and it’s frequently provided with the quote. You will have to arrange their work around that. For instance, when I subcontracted the foundation work, this was the first step that started the project, and I had to wait for it to finish before moving further.
Bill of Materials
The next step is to create a bill of materials (BOM) for your building project after subcontracting the foundation. There are kiosks available at many building supply stores that will assist you create a list of products needed based on your design and even schedule delivery.
Prior to assemble your BOM, make important decisions regarding the type of lumber (2×4 or 2×6) to use and the framing system (16″ or 24″ on center, for example). Your decisions should be guided by local building codes and insulation requirements.
Use the kiosk to obtain a recommended list of materials at a Menards or Home Depot store after you’ve made your initial selections. Review this list and make any required modifications, taking into account things like specialty equipment and extra supplies. To ensure compliance, familiarize yourself with the local building codes.
Your BOM can be completed gradually, and you might need to procure materials from several vendors. Make sure necessary parts arrive on time to expedite construction and meet important deadlines. Make delivery arrangements because it can be difficult to manually transfer big quantities of supplies. To facilitate unloading, try to arrange delivery after the foundation has hardened. To maximize efficiency, talk to delivery drivers about drop-off sites and take into account potential expenses for “alley” deliveries.
Lay the Foundation
Most of the time, people hire someone else to conduct the foundation work, which costs roughly $6,000 (although it varies), but if you would also want to do it yourself after this, this is still a wise investment.
To ensure the garage is placed correctly, it is essential to discuss the construction plan with the site preparers before the concrete is poured. Their knowledge is priceless because they can provide insightful information. In their situation, a power pole blocked easy access to the intended driveway. The plan originally called for a 2′ setback from the property line, but in order to avoid the pole, they increased it to 3′ on the advise of the concrete subcontractor. Setting up the forms must coincide with the final placement because it becomes difficult to make changes after the concrete is poured.
The placement of forms, defining the foundation lines in relation to the property lines, site preparation, excavation, soil compaction, backfilling with suitable class-5 gravel, and installing reinforcing metal rebar are important procedures in constructing the foundation. To verify code compliance and accurate alignment with the approved designs, a city inspection is necessary. This inspection is usually coordinated by the concrete subcontractor.
Concrete can be poured after the forms are examined and approved. Since anchor bolts are necessary for attaching the bottom sill plate of the framing, it is crucial to discuss anchor bolt location with the concrete experts. Make sure their placement complies with the construction regulations. For precise anchor placement, communicate the positions of access doors and above doors. To fit the doors, it could occasionally be necessary to add a single course of bricks around the foundation.
The framing inspection can be scheduled after the concrete has had roughly four days to cure, at which point building can start. This phase should be prepared for potential rain, since it frequently falls during the time of the lumber delivery. Prior to making final payments, it is imperative that any complaints with the concrete work be addressed, as it may become more difficult to rectify problems after complete payment.
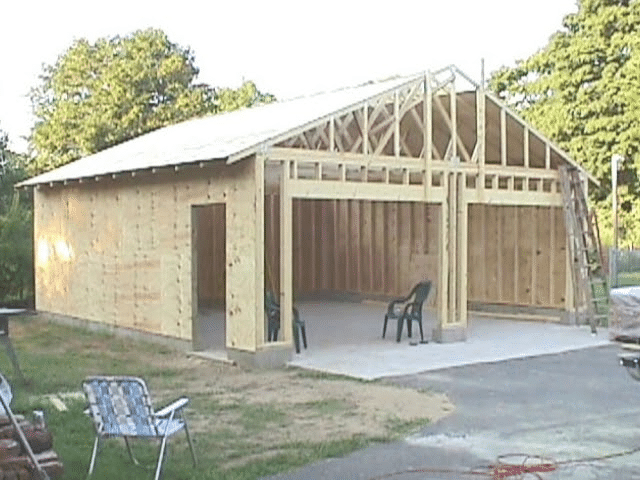
Start the Framing
The framing of the garage walls, which comes before apertures like doors and windows, outside sheathing, and interior coverings, is the initial stage of building a garage. Either a 24″ or 16″ center distance between studs is possible.
To manufacture the bottom sill plate for the east wall, one typically measures the width of the bottom concrete slab, or block and cuts 2x4s that have been treated with AC2 to make sure they satisfy the building code’s criteria for anchoring. They indicate the door opening, which should be marginally bigger than the door itself, and move the anchor bolt locations from the sill plate to match the external surface.
The first layer of the top plate was then formed by cutting untreated 2x4s to the same length as the treated sill plate. Both plates are placed side by side on a flat surface, and stud measurements are transferred from the sill plate to the top plate. They install 8′ studs at the indicated intervals.
They meticulously frame the building with jack studs, king studs, cripples, and a saddle stud at the base to accommodate window and door openings. The addition of a “interior wall stud” (also known as a “queen stud”) in the corners of new structure makes it easier to connect interior finishing materials.
Different nailing connections, such as end nails, toe nails, and bond nails, are used during the framing assembly process to secure the various framing pieces in place. Through painstaking design, measurement, and fastening of the framing components, they guarantee a strong and sturdy garage construction.
Place the outside sheathing
Around the external framing and interior wall, the team will apply the sheathing, which is commonly constructed of exterior-grade plywood or OSB. After that, the workers can make cuts in the sheathing surrounding the various window openings and door apertures.
Install siding and house wrap
The outside siding and house wrap of the garage will then be installed by your garage builder. A moisture barrier called house wrap guards against moisture and water damage to vinyl siding and the framing and sheathing below. In addition to providing protection for everything below, siding completes the exterior design of detached garage. Generally, especially if you’re constructing a garage that’s attached, you’ll want to coordinate the siding to the main construction.
Cover the Building With a Roof
With a crane, the construction crew will position the roof trusses before nailing them in place. The workmen may start putting the roofing membrane and the shingles on after the trusses are over the framing.
Put in the gutters
One of the most important external features of your home is the gutter system, which directs rainwater away from the foundation to lessen the possibility of soil movement and damage to the structure. It is highly advised that you connect your new gutters and downspouts in your garage to your current gutter system. Gutter installation is simple, but it’s important to have the right slope for drainage. As a result, we advise you to leave this to the experts.
Place the doors and windows
The workers will begin constructing windows, doors, and the garage door or garage door substitute once the construction, sheathing, and roofing are finished. Your building skills can come in handy if you’re helping to install doors and windows. However, doors can be harmful to set up considering they are heavy and have unsafe garage door springs, therefore make sure you leave that to the pros.
Additional Plumbing and Electrical Work
Local plumbers and electricians can begin work on the interior once the building is completed and weatherproofed. Plumbing is up to you, but electrical work is required for lighting and powering your power tools. Do you want to install a tiny bathroom, a sink for rapid cleanup before entering the home, or your laundry appliances in the attached garage? Plumbing might not be necessary if not, but this will be decided at the planning and design stage.
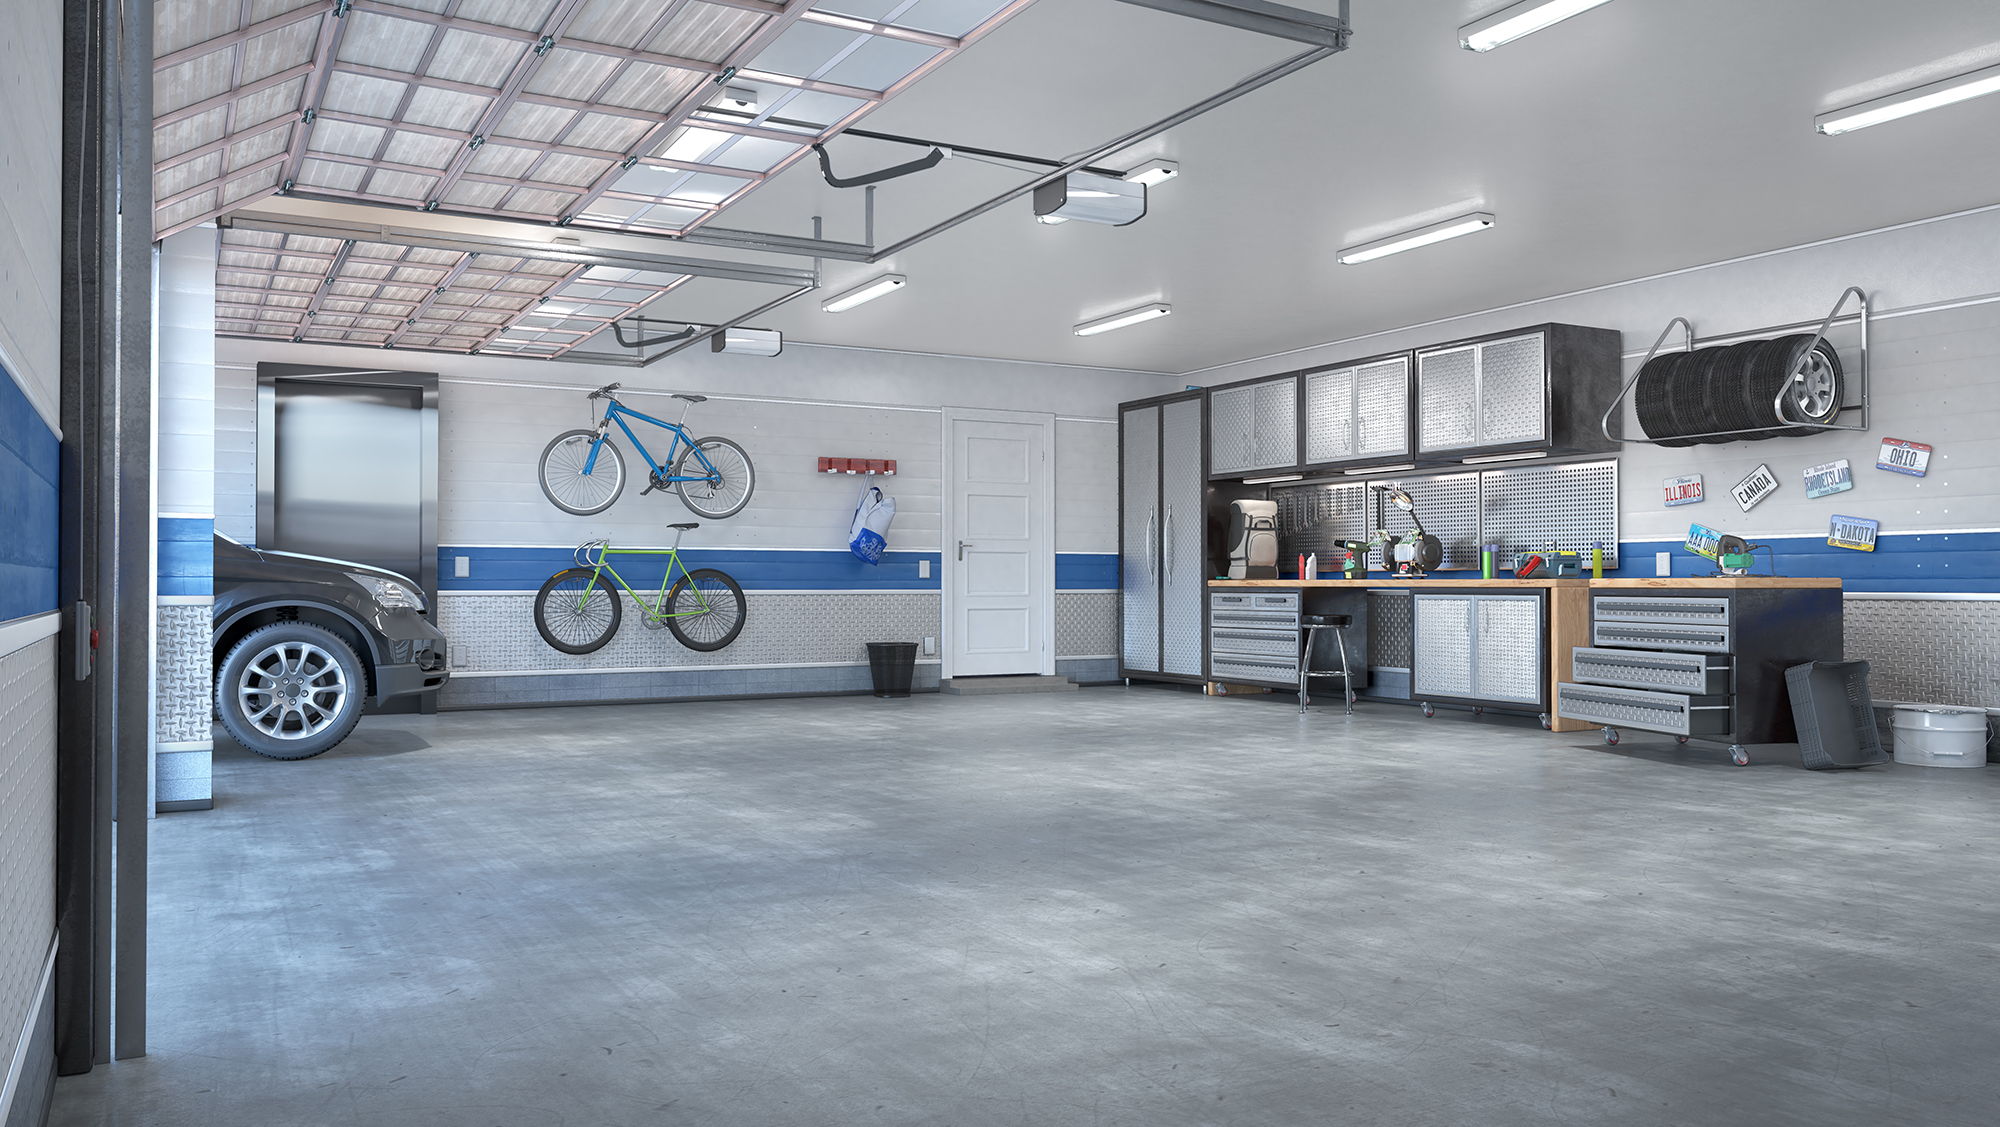
Installing drywall and insulation
Even if you don’t intend to spend much time in the garage, adding insulation can increase the building’s resistance to pests and the elements. You may need to add insulation to prevent the pipes from freezing if you want to have any plumbing, whether it’s a washer hookup for a laundry section or just a tiny sink to wash your hands after working with wood in the studio.
At this point, either you or the contractors will install the drywall, which, depending on local regulations, could need to be fire-resistant.
Complete With Last Touches
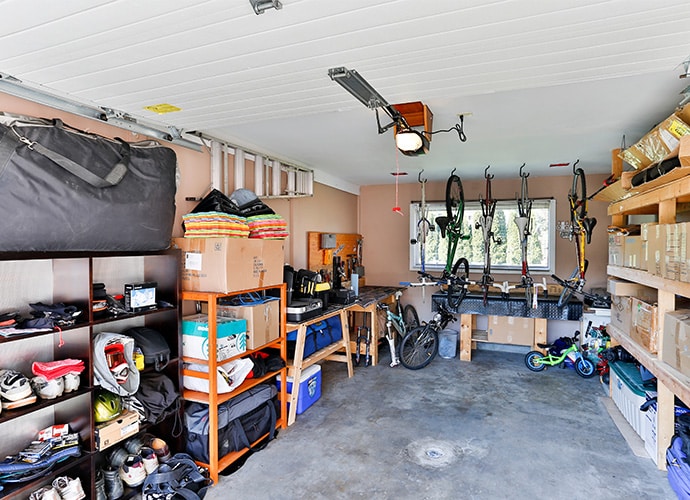
You may now concentrate on adding finishing touches, such as installing specialized shelves for garage organization or selecting automated light switches to turn on instantaneously when a car or a person enters the garage at night. Appliances, trim, wall paint, siding, epoxy garage floor sealants, and other finishing touches can all be installed right now to get your garage ready for family usage.
Maintaining and Taking Care of Your Garage
You probably don’t want to be spending time and money on major repairs or a complete rebuild anytime soon after you’ve put time and money into your garage project. Maintaining your garage can assist ensure that everything in it, including the concrete floors and the movable door, lasts longer.
- Examine and maintain the door – Although garage doors include various mechanical parts that allow them to open and close at the push of a button, you should still check the door roughly twice a year and repair it as necessary. Maintaining the system will extend the duration before the garage door needs to be replaced. This includes lubricating moving components and checking the chains and springs.
- Clean the Outside – Make use of the garden hose or a powerful pressure washer to wash the external surfaces of the garage door and the exterior of the garage at least once a year or every couple of months. If your garage door is heavily soiled, adding a moderate cleaning solution of regular dish soap and warm water will work.
- Maintain and Mend Garage Floors – Even if your garage flooring are only concrete, they are susceptible to damage from vehicles and other heavy machinery, including wear and strain and even cracking. Concrete floors may be kept spotless by vacuuming or brushing them once every two weeks, and concrete repairs can be done as needed. Small foundation cracks may typically be repaired by the homeowner, but larger or uneven cracks or problems with moisture should be addressed by a professional.
Frequently Asked Questions
What Garage Building Solution Is Most Budget-friendly?
Building in the pole style is one of the easiest and most economical ways to construct a garage. These are frequently called pole barns or post-frame buildings, and many people think they’re better than conventional stick-built garages.
Which Material Is Most Affordable To Build A Garage?
Looking at these benefits and drawbacks makes it clear that the most cost-effective building techniques for your do-it-yourself garage build are garage kits and post-frame construction. Although most do-it-yourself homeowners will find it to be the most time-consuming and expensive alternative, traditional stick framing is still an option.
What Is The Thickness Of A Garage Wall?
If it’s an inside wall, a garage wall can be as thin as 4.5 inches, but external walls need to be at least 6.5 inches thick. A garage wall has to be denser the more weight it must hold. The installation of siding and the manner a wall is finished on the inside and outside will change the wall’s measurements.
Are Footings Required For A Garage?
Unless your lot slopes or has poor soil characteristics, foundation footings are not necessary for basic garage construction. The majority of garages have a 4′′ thick concrete slab that is poured immediately on the ground.
What Value Does a Garage Add to a Home?
As a general guideline, however, a single garage can increase your property’s value by 5–10% and a double garage by up to 20%.
Conclusion
Building a garage door on a shoestring budget is a challenging but achievable endeavor. You can build a garage door that is both practical and reasonably priced with a little ingenuity and careful thought. The thrill of finishing this job within your budget can be very fulfilling, even though it might not have all the bells and whistles of a professionally built door. In your design, keep in mind to give priority to functionality, durability, and safety. We wish you well on your low-budget garage door renovation!